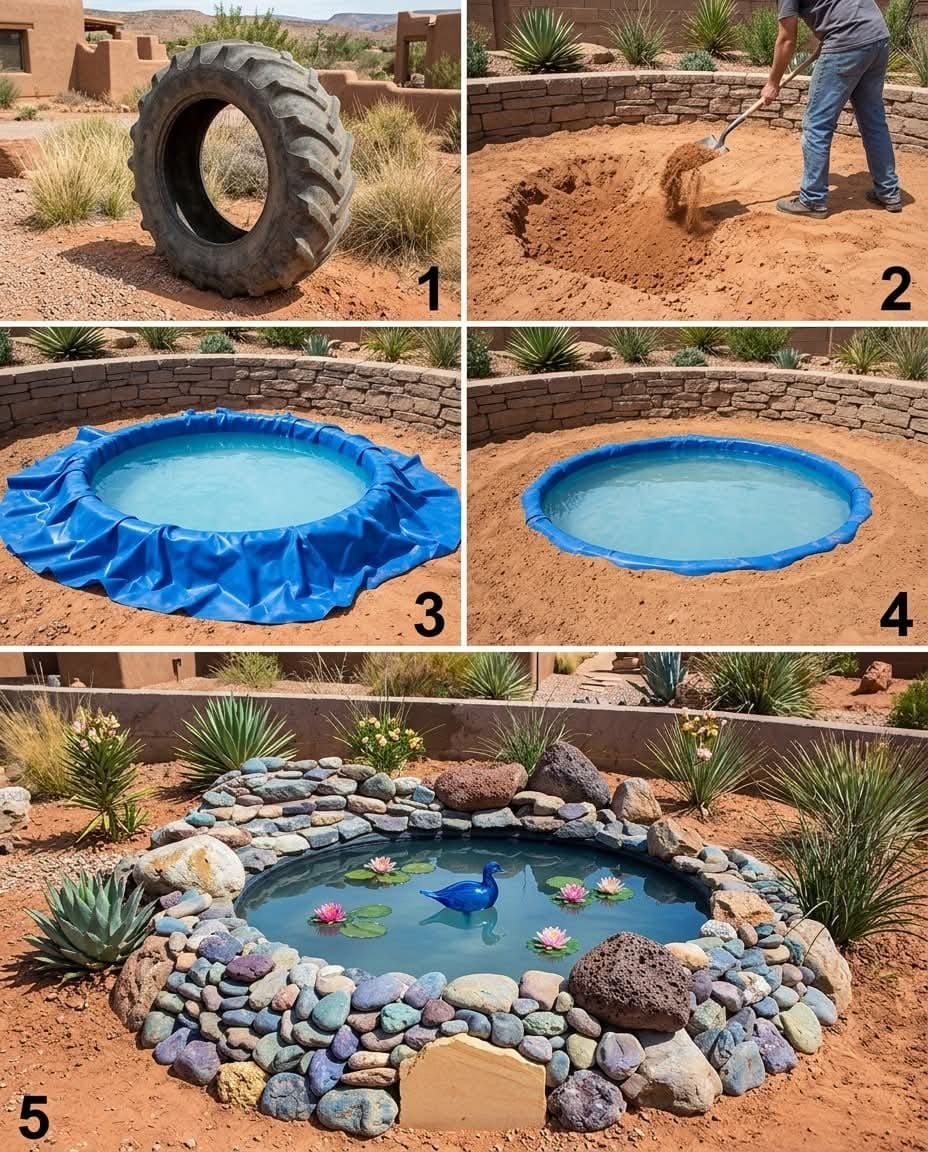
 Step 2: Prepare the Tire
- Clean the tire thoroughly
- If you want a wider opening, cut off the top sidewall using a strong knife
 This creates a more natural “pond” look and more space for water and plants.
 Step 3: Dig the Hole
- Dig a hole slightly larger than the tire
- Depth should allow the tire to sit flush with the ground
This makes the pond look natural and stable.
 Step 4: Level the Base
- Add a layer of sand at the bottom
- Flatten and level it carefully
A level base prevents water from pooling unevenly.
 Step 5: Place the Tire
- Set the tire into the hole
- Check that it sits evenly on all sides
Adjust with sand if needed.
 Step 6: Add the Liner
- Place the pond liner inside the tire
- Press it down to follow the shape
- Leave extra liner hanging over the edges
Make sure there are no sharp edges that could puncture it.
 Step 7: Secure the Edges
- Fold the extra liner over the tire edges
- Cover with stones, bricks, or gravel
This holds everything in place and improves appearance.
 Step 8: Fill with Water
- Slowly fill the pond with water
- Smooth out wrinkles in the liner as it fills
 Step 9: Add Plants & Features
Make your pond come alive:
- Add aquatic plants (like water lilies or floating plants)
- Place small stones inside for decoration
- Install a solar fountain for movement and oxygen
 Step 10: Make It Wildlife-Friendly
- Add a small ramp or stones so animals can safely drink and exit
- Keep part of the pond shallow
This helps birds, bees, and frogs safely use your pond.
 Safety Tips
- Avoid using heavily damaged or chemically contaminated tires
- Don’t let water stagnate too long—add movement or change it regularly
- Keep it safe if you have small children (shallow design is best)
 Why This Project Matters
Reusing tires helps reduce environmental waste and gives old materials a second life. In places like Morocco, where creative recycling is valuable, this project is both practical and eco-friendly.
 Final Thoughts
A tire pond is more than just decoration—it’s a small ecosystem, a peaceful feature, and a great DIY project you can build in a day.
With a little effort, you can transform something old into something beautiful… and bring your garden to life 
For Complete Cooking STEPS Please Head On Over To Next Page Or Open button (>) and don’t forget to SHARE with your Facebook friends.
